How to Put Oil in Your Engine Car Like a Mechanic 2018
Changing your engine oil doesn’t have to be hard. This guide shows you how to put oil in your engine car like a real mechanic, using simple steps anyone can follow. You’ll learn about the right oil type, the tools you need, and common mistakes to avoid. By the end, you’ll feel confident doing your own oil change at home.
Changing your engine oil is one of the simplest yet most important car maintenance tasks you can do. Whether you’re a complete beginner or someone who wants to save money on shop visits, learning how to put oil in engine car mechanic style is easier than you think.
Back in 2018, many car owners started taking charge of their own vehicle care. With a few basic tools and a little know-how, you can change your oil right in your driveway. This guide walks you through every step, just like a real mechanic would. No fancy garage needed. No expensive bills either.
We’ll cover everything from choosing the right motor oil to disposing of the old stuff safely. By the time you finish reading, you’ll have the confidence to handle this job on your own. Let’s get started.
Key Takeaways
- Know Your Oil: Always check your owner’s manual for the right oil viscosity and capacity.
- Gather the Right Tools: A socket wrench, oil filter wrench, drain pan, and jack stands are essential.
- Warm the Engine First: Running the engine for a few minutes helps the oil drain better.
- Check the Oil Level Afterward: Use the dipstick to make sure you added the correct amount.
- Dispose of Old Oil Properly: Never dump old oil. Take it to a recycling center.
- Change Your Oil Filter Too: A fresh oil filter keeps your engine running clean and smooth.
- Follow the Manufacturer’s Schedule: Stick to the recommended oil change interval for best results.
📑 Table of Contents
Why Changing Your Engine Oil Matters
Engine oil is the lifeblood of your car. It lubricates all the moving parts inside your engine. Without clean oil, metal parts grind against each other. This causes wear, heat, and eventually engine failure.
Over time, oil breaks down. It gets dirty from dust, debris, and combustion byproducts. Old oil loses its ability to protect your engine. That’s why regular oil changes are so important. Most manufacturers recommend an oil change interval every 5,000 to 7,500 miles. Check your owner’s manual for the exact number.
Skipping oil changes can lead to costly repairs. A new engine can cost thousands of dollars. A simple oil change costs a fraction of that. It’s one of the best investments you can make for your vehicle’s longevity.
Signs Your Oil Needs Changing
How do you know it’s time for an oil change? Here are a few clear signs:
- The oil looks dark and gritty on the dipstick.
- You hear unusual engine noises like knocking or ticking.
- The oil pressure warning light comes on.
- You notice a burning smell inside the car.
- Your vehicle has hit the mileage mark for its next change.
Don’t ignore these warnings. Addressing them early keeps your engine healthy and running strong.
Choosing the Right Oil for Your Car
Picking the correct oil is the first real step in the process. Not all oils are the same. Different engines need different formulations. Using the wrong oil can cause poor performance or even damage.
Understanding Oil Viscosity
Oil viscosity refers to how thick or thin the oil is. You’ll see numbers like 5W-30 or 10W-40 on the bottle. The first number (with the W) shows how the oil flows in cold weather. The second number shows the thickness at operating temperature.
In 2018, most cars came with a manufacturer-recommended viscosity. Always go with what the automaker suggests. You can find this information in the owner’s manual or on the oil fill cap under the hood.
Synthetic vs. Conventional Oil
There are two main types of motor oil: synthetic and conventional.
- Conventional Oil: This is the standard option. It works well for older engines and normal driving conditions. It’s also more affordable.
- Synthetic Oil: This is a high-performance option. It lasts longer and handles extreme temperatures better. It’s ideal for modern engines and heavy-duty use.
Some cars require synthetic blend oil. Again, check your owner’s manual. Using the right type ensures proper engine lubrication and protection.
Tools and Materials You’ll Need
Before you start, gather everything you need. Having all your tools ready makes the process smooth and stress-free. Here’s a complete list:
- The correct type and amount of motor oil
- A new oil filter (check your manual for the right part number)
- A socket wrench and the correct socket size
- An oil filter wrench
- A drain pan to catch the old oil
- A funnel for pouring new oil
- A jack and jack stands or ramps
- A rag or paper towels
- A torque wrench
- Gloves and safety glasses
Having these items on hand before you start saves time and frustration. You don’t want to be halfway through the job and realize you’re missing something.
Quick Tips for Tool Preparation
Make sure your socket wrench fits the drain plug snugly. A loose socket can strip the plug and cause a leak. Also, place your drain pan directly under the drain plug before you loosen it. Old oil can flow fast and make a mess if you’re not ready.
Step-by-Step Guide to Putting Oil in Your Engine
Now let’s get into the actual process. Follow these steps carefully, and you’ll have a clean, successful oil change every time.
Step 1: Warm Up the Engine
Start your car and let it run for about 3 to 5 minutes. This warms up the oil and makes it flow more easily. Warm oil drains out faster and carries more contaminants with it. Just don’t let the engine get too hot. You should be able to touch the hood without burning your hands.
Step 2: Lift the Vehicle Safely
Use a jack to lift the front of the car. Then place jack stands under the frame for support. Never work under a car that’s only held up by a jack. Jack stands keep you safe. Alternatively, you can drive onto ramps if your vehicle has enough ground clearance.
Step 3: Locate the Drain Plug
Crawl under the car and find the oil pan. The drain plug is a bolt at the bottom of the oil pan. Place your drain pan directly beneath it. Use your socket wrench to loosen the plug by turning it counterclockwise.
Be careful. The old oil will be warm. Wear gloves and let the oil flow out completely. This usually takes about 10 to 15 minutes.
Step 4: Remove the Old Oil Filter
While the oil is draining, use your oil filter wrench to loosen the old filter. Turn it counterclockwise. It may be tight, so use steady pressure. Once it’s loose, remove it by hand. Be ready for some oil to spill out. That’s why the drain pan should be right there.
Step 5: Install the New Oil Filter
Before you install the new filter, rub a little fresh oil around the rubber gasket. This creates a good seal and makes removal easier next time. Screw the new filter on by hand. Tighten it snugly but don’t overdo it. Most filters need about three-quarters of a turn after the gasket contacts the engine.
Step 6: Replace the Drain Plug
Once all the oil has drained, reinstall the drain plug. Use your torque wrench to tighten it to the manufacturer’s specification. Over-tightening can strip the threads or crack the oil pan. Under-tightening can cause leaks. A torque wrench takes the guesswork out of this step.
Step 7: Add New Oil
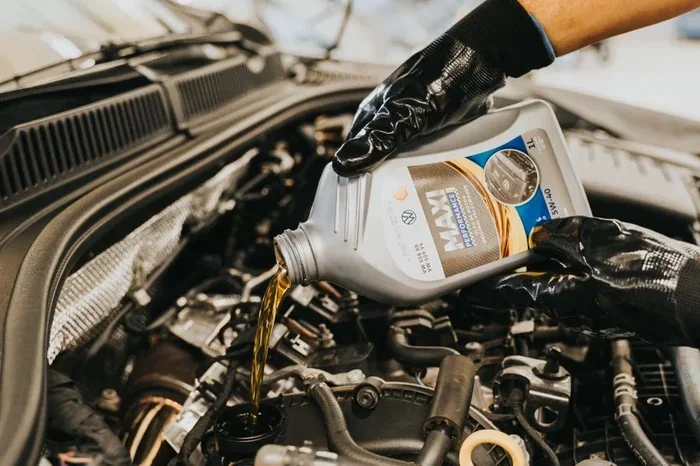
Now for the fun part. Pop the hood and locate the oil fill cap. Remove it and place a funnel in the opening. Pour in the new oil slowly. Check your manual for the exact oil capacity. Most cars take between 4 and 6 quarts.
After pouring, wait a few minutes for the oil to settle. Then pull out the dipstick, wipe it clean, reinsert it, and pull it out again to check the level. The oil should be between the minimum and maximum marks on the dipstick.
Step 8: Clean Up and Dispose of Old Oil
Wipe any spilled oil with a rag. Replace the oil fill cap. Start the engine and let it run for a minute. Check under the car for any leaks around the drain plug or oil filter. Turn off the engine and wait a few more minutes. Check the dipstick one more time to confirm the oil level is correct.
Take the old oil and filter to a recycling center or auto parts store. Many stores accept used oil for free. Never pour old oil down the drain or onto the ground. It’s harmful to the environment and illegal in most areas.
Common Mistakes to Avoid
Even experienced DIYers make mistakes. Here are some common errors to watch out for:
- Overfilling the Oil: Too much oil can cause foaming and reduce lubrication. It can also damage the engine over time. Always add oil gradually and check the dipstick frequently.
- Using the Wrong Oil: Not all oils are created equal. Using the wrong viscosity or type can hurt engine performance. Always follow the manufacturer’s recommendation.
- Forgetting the New Oil Filter: Running an engine with an old filter means dirty oil circulates constantly. Always install a fresh filter with every change.
- Skipping the Torque Wrench: An improperly tightened drain plug can leak. An over-tightened plug can strip the threads. A torque wrench solves both problems.
- Not Checking for Leaks: Always inspect under the car after an oil change. Catching a leak early prevents bigger problems down the road.
Avoiding these mistakes saves time, money, and headaches. A little care goes a long way.
Expert Insights on Engine Oil Maintenance
Professional mechanics agree that consistency is key. Changing your oil on schedule keeps the engine running at its best. Here are a few expert tips to keep in mind.
Track Your Oil Changes
Keep a log of every oil change. Write down the date, mileage, oil type, and filter used. This record helps you stay on top of maintenance. It also adds value if you ever sell the car. Buyers appreciate a well-documented maintenance history.
Check Oil Between Changes
Don’t wait for the next scheduled change to check your oil. Pull the dipstick once a month. Look for changes in color or level. Low oil can mean a leak or excessive burning. Catching these issues early prevents expensive repairs.
Consider Your Driving Conditions
Stop-and-go city driving is harder on oil than highway cruising. If you drive in extreme heat, cold, or dusty conditions, you may need to change your oil more often. These are called “severe” driving conditions. Your owner’s manual will have guidance on this.
Taking care of your engine oil is one of the simplest things you can do for your car. It pays off in reliability, performance, and longevity.
Key Takeaways
- Know Your Oil: Always check your owner’s manual for the right oil viscosity and capacity.
- Gather the Right Tools: A socket wrench, oil filter wrench, drain pan, and jack stands are essential.
- Warm the Engine First: Running the engine for a few minutes helps the oil drain better.
- Check the Oil Level Afterward: Use the dipstick to make sure you added the correct amount.
- Dispose of Old Oil Properly: Never dump old oil. Take it to a recycling center.
- Change Your Oil Filter Too: A fresh oil filter keeps your engine running clean and smooth.
- Follow the Manufacturer’s Schedule: Stick to the recommended oil change interval for best results.
Conclusion
Learning how to put oil in engine car mechanic 2018 style is a skill that pays off every single time. You save money, gain confidence, and keep your car running strong. The process is straightforward once you know the steps and have the right tools.
Start by choosing the correct motor oil and gathering your supplies. Warm up the engine, lift the car safely, and drain the old oil. Replace the filter, add fresh oil, and check for leaks. Dispose of the old oil responsibly. It’s that simple.
Don’t let the idea of an oil change intimidate you. With a little practice, you’ll do it faster and better each time. Your engine will thank you with smooth, reliable performance for years to come. So grab your tools, roll up your sleeves, and give it a try. You’ve got this.
Frequently Asked Questions
What type of oil should I use for my car?
Check your owner’s manual for the recommended oil viscosity and type. Most 2018 cars work well with 5W-30 or 10W-40 oil. Always follow the manufacturer’s specification for the best results.
How often should I change my engine oil?
Most manufacturers recommend an oil change every 5,000 to 7,500 miles. However, if you drive in severe conditions like extreme heat or heavy traffic, you may need to change it more often. Always refer to your owner’s manual for the exact interval.
Can I use synthetic oil in any car?
Most modern cars can use synthetic oil, but some older vehicles may not be compatible. Check your owner’s manual or consult a mechanic. Using the wrong oil type can affect engine performance and warranty coverage.
How do I know if I added too much oil?
Check the dipstick after adding oil. The level should be between the minimum and maximum marks. If it’s above the maximum line, drain the excess oil. Too much oil can cause foaming and engine damage.
What should I do with my old engine oil?
Never pour old oil down the drain or onto the ground. Take it to a recycling center or an auto parts store that accepts used oil. Many stores offer free collection. It’s the environmentally responsible thing to do.
Do I need to change the oil filter every time?
Yes, always install a new oil filter with every oil change. A fresh filter removes contaminants and keeps your engine oil clean. Reusing an old filter reduces the effectiveness of your oil change.